Wookie Cookies
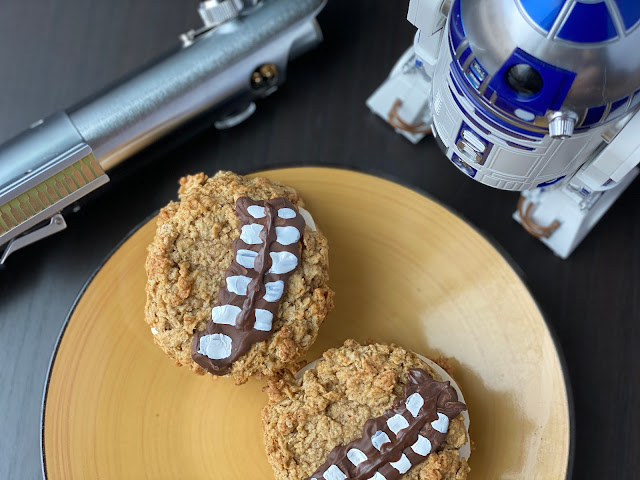
May the 4th Be With You, my friend! As a celebration of Star Wars fandom and delicious Disney Parks treats I made a Wookie Cookie! It is an oatmeal sandwich cookie with sweet, creamy butter cream in the middle. These cookies were previously found in Hollywood Studios with a decorated chocolate piece.
My husband is a huge Star Wars fan so naturally we have some seriously fun stuff in the house. He has been building in amazing collection of light sabers with color-changing blades, music, and amazing sound effects. Naturally I had to use them as an accompaniment for my Wookie Cookies! Luke's light saber is the newest addition to his collection.
To make the classic Chewbacca bandolier, I used Ghiradelli chocolate melts piped and smoothed down with a small offset spatula. After laying down the chocolate, I used edible white paint to create the cartridge casings for his bowcaster. Finally I pipped a small line of connected dots over the rectangles. This created a layered look and helped to square up the edges!
Overall, my Wookie Cookies were soft and delicious and absolutely stuffed with cream. Mini Mouse was a huge fan of digging the icing out of the middle and smiling conspiratorially as she stuck her
finger in her mouth! I think these cookies are great for anyone who loves oatmeal even if they don't love raisins. I was a huge fan of oatmeal cream pies from Little Debbie when I was a kid - these are really an adult version of that! Give them a try and let me know if you felt the force was guiding you...
Wookie Cookie
Yield 9 sandwich cookies
Ingredients
- 1 cup unsalted butter, softened
- 3/4 cup firmly packed light brown sugar
- 1/2 cup granulated sugar
- 2 large eggs
- 1 teaspoon pure vanilla extract
- 1 1/2 cups all-purpose flour
- 1 teaspoon baking soda
- 1 teaspoon ground cinnamon
- 1/2 teaspoon salt
- 3 cups quick or old fashioned oatmeal
Butter Cream Filling
- 3/4 cup (1 1/2 sticks) cup unsalted butter, softened
- 2 1/2 cups confectioners' sugar, sifted
- 1 teaspoon pure vanilla extract
- 1 tablespoon milk or half and half
Instructions
- Preheat oven to 350°F. Line cookie sheets with parchment paper.
- In the bowl of a stand mixer fitted with the paddle attachment, or in a large bowl with an electric mixer, cream together butter and sugars until light and fluffy, about 3 minutes. Add in eggs and vanilla and mix until combined.
- In a medium bowl, whisk together the flour, baking soda, cinnamon and salt. Slowly add the flour mixture to the wet ingredients, mixing until just combined. Add in oats and mix until incorporated.
- To make large cookies, use a large cookie scoop (about 3 tablespoons) to drop dough onto prepared cookie sheets. Bake in preheated oven for 13-15 minutes or until golden brown. Allow cookies to sit on cookie sheets for about 5 minutes before removing them to a wire rack to cool completely. To makes small cookies, use a medium cookie scoop (about 1.5 tablespoons) of dough per cookie and bake for 10-12 minutes. Once cookies have cooled completely, prepare the cream filling
- Prepare the buttercream filling: In the bowl of a stand mixer fitted with the paddle attachment, beat butter on medium-high speed for about 5 minutes. This process will lighten the color of the butter and ensure you buttercream in extra fluffy.
- Turn the speed down to low and gradually add in the powdered sugar. Continue mixing on low speed until the powdered sugar is completely incorporated. Add in vanilla extract and milk and mix until combined.
- Turn mixer back up to medium-high speed and beat the mixture for an additional 3-5 minutes. If needed, add in a little more cream 1 teaspoon at a time until you reach the consistency you desire.
- To assemble the cookies, pipe or spread the cream filling on the flat side of half of the cookies and put the remaining cookies on top. Enjoy!


The information you've provided is quite useful. It's incredibly instructional because it provides some of the most useful information about Natural Candy Food Color supplier. Thank you for sharing that.
ReplyDelete